Setting Up and Using Google My Business
Date: February 27, 2020
When you search for a business on Google, you’ve likely noticed a square box on the right side of the screen containing all sorts of information on the business. This is known as a Google My Business (GMB) listing. It is a centralized spot where business owners can input all of their company’s information, making it easier for potential customers to find them.
In this blog post, we’ll be going into detail about how to set up a Google My Business Profile.
1. Set up a Google Account
The first step to creating a Google My Business listing is to make sure you have an active Google account. If you only have a personalized email, this is a good time for you to create your business’s email address, which can easily be done through Gmail.
2. Go to google.com/business
Once you are signed into Google, you’ll want to go to https://google.com/business. This will bring you to the Google My Business homepage.
From there, click “Manage Now” in the top right corner.
3. Enter Your Business Name
Now that you’re officially in the site, it’s time to set up your Google My Business account. The first step to doing that is, not surprisingly, to enter your business’s name.
4. Enter Your Business’s Address
Once people know what your business is named, they’ll want to know where it’s located. Enter your business’s street address in the designated fields. Make sure to include elements like your suite number (when applicable) and your zip code!
You’ll probably notice two boxes with the option to check them. The first one reads “I deliver goods and services to my customers.” Check this box if your business provides a delivery service
Under that box, you’ll see another line reading “Hide my address (it’s not a store).” Like the parenthesis indicate, this applies if your business has a physical location but is not a commercial retail space.
If you are a traditional business that does not deliver and has a physical space, leave both of these boxes unchecked and click “Continue.”
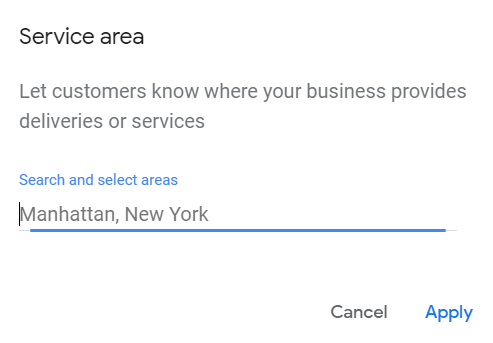 5. Input Your Service Areas
Your business’s service areas allow you to expand your reach. If, for example, your business is physically located in Wayne, New Jersey, but it services the entire Northern New Jersey area, you can input up to 20 separate towns or counties, which will help your business show up in more search results.
You are able to add zip codes, town names, specific county names, and/or states. At 9Sail, we recommend inputting a combination of specific towns with zip codes, as well as some counties, depending on your business’s reach. We’ve seen increased success by including 75% town names with the final 25% being dedicated to counties.
6. Pick Your Business’s Category
The next step to setting up your GMB listing is to choose your business’s category. Google has a comprehensive list of different business categories to choose from. You can view the entire list here and choose which one is most applicable to your business.
7. Add Your Contact Information
You want potential customers to be use your GMB listing as a jumping off point. For this to be successful, you need to supply your GMB listing with your contact information, so that when your business listing shows up on a search engine results page (SERP), searchers can either call your business or visit your website.
To do so, you’ll need to input your business’s phone number into your listing. Google My Business hyperlinks its phone numbers, so you can simply click it and make the call; there’s no need to copy it down.
You’ll also need to enter your website’s URL. This is a great way to organically increase your traffic. You’ll be able to see specifically how many people visited your website and/or called your business through the GMB listing.
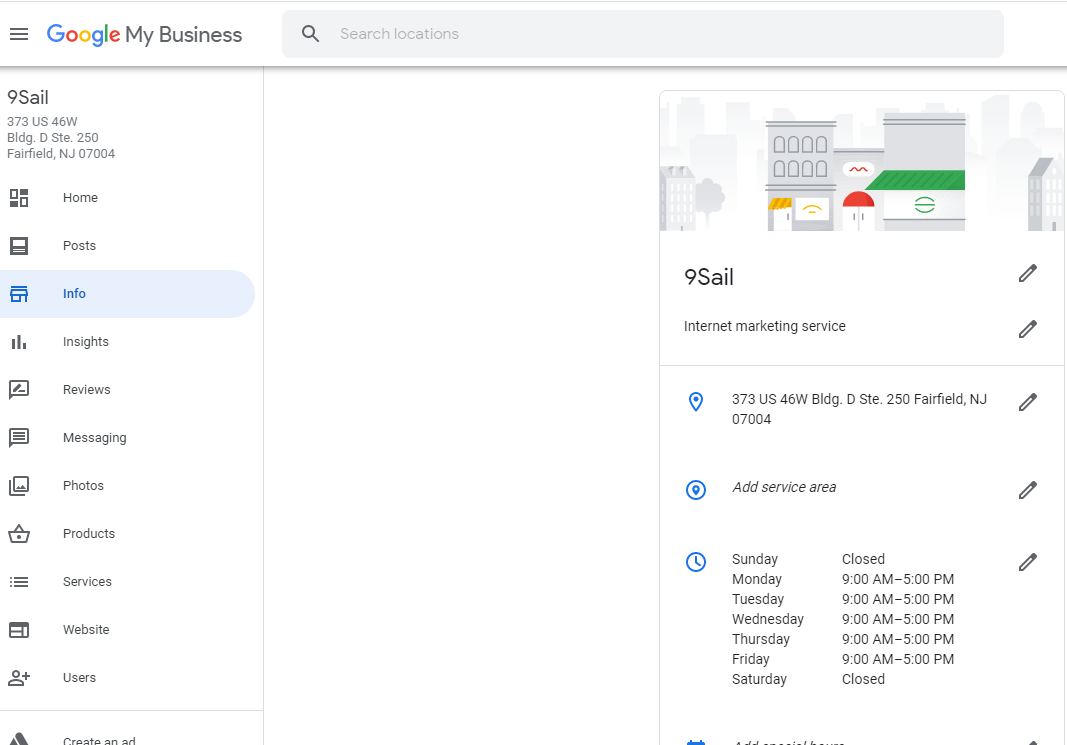
8. Add Your Business Hours

There are few things worse than driving to a business, only to find the doors locked and the lights turned off. To make sure this doesn’t happen to your business, you should add your business hours to your GMB listing.
Click the “Info” tab on the left and scroll down to the section marked “Business Hours.” There will be seven drop down menus, one for each day of the week. If your business is closed on one of those days, click the “Closed” tab. Otherwise, go through each day of the week and insert your opening and closing hours.
9. Verify Your Account
You’ll need to verify your business is legitimate before Google publishes your GMB listing. There are a few different verification methods Google uses, but no matter which verification option you’re given, know that it will be an easy process.
The Postcard Verification Method
A postcard will be sent to the address you entered as your business’s location. The postcard will contain a unique code. You’ll take that code and input it into your GMB account. After that, you’ll be officially verified.
The postcard typically takes about 5 days to reach your business, so exercise patience when waiting for its arrival.
The Phone Verification Method
If you’re eligible to complete your registration by phone, the option will be suggested to you at the beginning of the verification process. You’ll get a phone call with your code, which you can input on your GMB account
The Email Verification Method
Email verification is similar to the phone verification as it is only available for some businesses and you’ll be made aware if the option is available for your business. A unique code will be emailed to you.
10. Adding Media
You may have noticed that company’s GMB listings are often supplemented with images. You can add relevant media to your business’s listing by simply clicking “Photos” on the left side of the screen.
From there, you’ll click “Add Photos” and select which specific images you want to upload. Click “Add Video” if you have an applicable video that’s 30 seconds or less. You can also choose “Add Logo” if you have your business logo readily available.
11. Write a Business Description
Back in the “Info” tab, scroll down to “Business Description” This is your chance to write a unique and enticing description for your business. Take some time when crafting your business’s description to make sure that it’s appealing, well-written, and attention grabbing.
12. Reviews
While you won’t have any reviews as you complete the initial set up for your GMB account, it’s an element you should be made aware of. This centralized spot will house all of your Google reviews, making it easy for you to see exactly what people are writing.
It is also extremely easy for you to reply to each review (a practice 9Sail strongly advocates for). We recommend that you check your GMB listing for new reviews at least once a week, and if you see any new reviews, make sure to respond to them. You can view your reviews by clicking “Reviews” on the left side of the screen.
From there, your Google My Business listing should be ready to start showing up on Google searches. However, GMB is not something that you simply set and forget! You’ll want to get into the habit of regularly checking it for any changes and reviews.
If you’d like some additional help with setting up and managing your Google My Business account, search engine optimization, or pay-per-click advertising, reach out to the team at 9Sail today!